Call 315-362-9772 for details or leave us a note

PECk-O-MATIC Assembly Instructions Video


PECk-O-MATIC Assembly Instructions


Verify all contents of your PECk-O-MATIC Demand Feeder kit. It should contain the following:

peckomatic One Feeder Funnel
One Feeder-Funnel
peckomatic One Trigger Rod
Peckomatic One Trigger Rod
One Trigger-Rod
peckomatic One Catch Dish
Peckomatic One Catch Dish
One Catch-Dish
peckomatic One Catch Dish Lock
Peckomatic One Catch Dish Lock
One Catch-Dish-Lock
peckomatic Six Regulator Disks
Peckomatic Six Regulator Disks
Six Regulator-Disks
peckomatic One Pail Hanger
Peckomatic One Pail Hanger
One Pail-Hanger


Prepare your round pail (not included in this kit) to insert Feeder-Funnel by drilling or cutting out 4” hole at the bottom center of your pail.

pail
pail
Pail


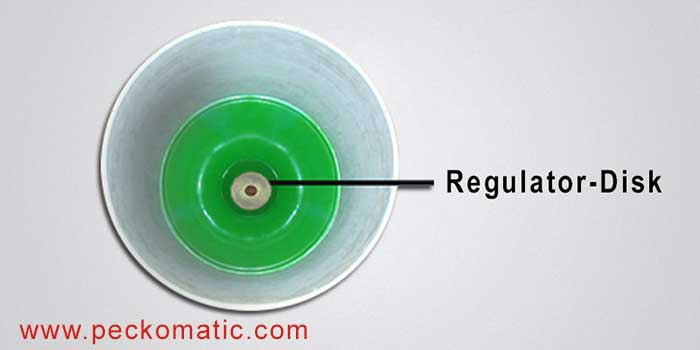
Review the pictures of the six Regulator-Disks. Review its openings and recommended feed to use with each Regulator-Disk.

Six Regulator Disks
Six Regulator-Disks
Six Regulator-Disks


Based on your feed and recommended Regulator-Disk opening, select one Regulator-Disk to use with your feed. Note: If you find our recommended opening too small or too large, change to another disk. You can also make your own disk with your desired opening to use with PECk-O-MATIC.


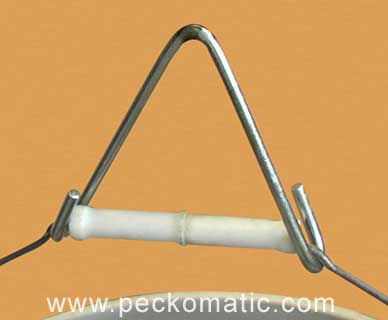
Securely hang your pail using the Pail-Hanger ( or Pail-Holder or Pail-Stand sold separately) so that the bottom of the pail is at least 14" above floor level and insert the tube end of the Feeder-Funnel from inside the pail. When properly inserted, this Feeder-Funnel should seat tight against the inside wall of the pail with the entire tube end of the funnel sticking out through the bottom hole.

Hanger
HangerFeeder funnel
Feeder funnel
Feeder funnel
Feeder funnel
Feeder funnel


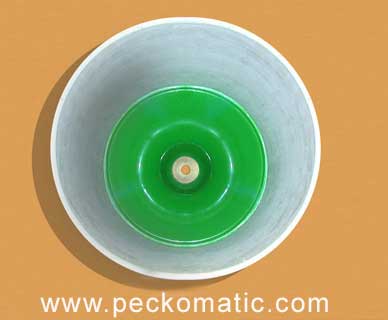
Place the Regulator-Disk you selected at the funnel opening.
 

Regulator-Disk
Regulator-Disk


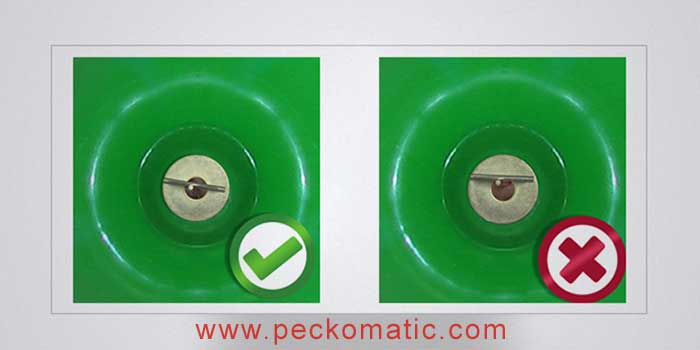
Insert the long end of the Trigger-Rod from inside and position it at the center of the Regulator-Disk opening.

Trigger-Rod
Trigger-Rod


Insert the Catch-Dish from the long end of the Trigger-Rod and lock it at desired height using Catch-Dish-Lock by lightly pressing together two open ends, pass the Trigger-Rod thru the holes, and release.


To test your feeder setup, put two cups of feed into the pail while keeping the Trigger-Rod somewhat at the center of the Regulator-Disk. Then wiggle Catch-Dish to make the Trigger-Rod oscillate and see small quantity of feed is dropping. Change the Regulator-Disk to increase/decrease quantity of the released feed. (See instruction below to change the Regulator-Disk).


To train your birds, put one cup of feed in the Catch-Dish and see how quickly they learn.

Instruction to change Regulator-Disk

To change the Regulator-Disk, remove the Catch-Dish-Lock and Catch-Dish and pull out the Trigger-Rod. Repeat Step 6, 7 and 8 with the newly selected Regulator-Disk.

Instructions to use with smaller pails

You can use PECk-O-MATIC kit with smaller pail if you skillfully and carefully cut the Feeder-Funnel to fit inside your smaller pail.

PECk-O-MATIC Pail-stand Assembly Instructions


Verify contents of your PECk-O-MATIC Pail-stand kit. It Should contain the following:

peckomatic Drinker pail-stand circular ring
One Circular Ring
peckomatic drinker pail-stand legs
Three Legs
peckomatic drinker pail-stand carriage bolt
One Carriage Bolt
peckomatic drinker pail-stand wing nut
One wing Nut
peckomatic drinker pail-stand six small nut and bolt
Six Small Nut and Bolt in one ziplock bag


Keep the Circular Ring on the ground, as shown in the picture.


peckomatic pail-stand Circular ring


Take one Leg and insert it into the slot on the Circular Ring. Secure the leg to the Circular Ring using two bolts and nuts.

peckomatic pail-stand one leg inserted


Repeat Step 3 with the other two legs also.


Once all three legs are secured, place the Pail-Stand upright. Tighten all the nuts to ensure that the Pail-Stand is steady.
 

peckomatic drinker pail stand


Insert the Carriage Bolt in the slot and fasten the Wing Nut.


peckomatic drinker pail-stand carriage bolt in slot


Place the PECk-O-MATIC Poultry Drinker in the Pail Stand. Using the wing Nut, tighten the Circular Ring so that Peck-O-Matic Poultry Drinker is held securely.
 

peckomatic drinker with pail stand


To adjust the height of PECk-O-MATIC Poultry Drinker, loosen the Wing Nut, place PECk-O-MATIC Poultry Drinker at the desired height, and tighten the Wing Nut to hold the bucket securely at the height. The height can be adjusted from 2" mark to 8" mark on the Poultry Drinker.

peckomatic drinker with  pail stand